
Why an old building instead of a new one?
Old houses have a special charm and are often cheaper to maintain than a new build of the same size with similar fittings. However, if you decide to buy an old building, you should plan for the necessary refurbishment work from the outset and add it to the purchase price of the house. On the one hand, this includes modernisation measures that come down to personal taste, such as opening up walls, laying new floors or renovating stairs and doors. On the other hand, most old buildings also require age-related refurbishment work, such as new thermal insulation or retrofitted waterproofing measures. Many homeowners are afraid of the cost and effort involved in refurbishing an old building. The fact is, however, that if the refurbishment measures are well planned and expertly carried out, they not only improve the quality of your home, but also save you a lot of money on energy and heating costs in the long term.
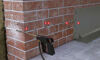
Typical causes of damage to buildings
- Rain and splashing water: Moisture penetrates from outside into the masonry due to absent or faulty wall base waterproofing and thus saturates the wall cross-section.
- Moisture from outside: Moisture penetrates into the masonry and/or the floor slab due to absent or faulty exterior waterproofing.
- Rising damp: Moisture penetrates into the masonry and rises through capillary action in the wall cross-section due to an absent or faulty horizontal impervious layer or exterior waterproofing
- Hygroscopic moisture: Salts present in the masonry can absorb moisture from the ambient air and deposit it in the building material.
- Condensation: On cold surfaces that occur due to heat bridges or damp masonry, the water vapour present in the room can condense to form water on the surface of the building element.
There’s no need to worry: professional refurbishment work that is tailored to your property will get these problems under control.

All the advantages of the RIG
- 10-year quality guarantee
- Results you can rely on from certified and specially trained RIG specialist companies
- Tried-and-tested RIG systems have been used for more than 100,000 m² of basement refurbishments
- Certified quality assurance without unexpected follow-on costs
- Qualified advice and support from the executing company over the entire warranty period

The RIG systems for your building refurbishments at a glance
1. Subsequent exterior waterproofing on old bitumen
Before waterproofing can be carried out, the building elements must be exposed and the type and condition of any existing old waterproofing must be assessed. In the case of old waterproofing containing bitumen, it must be checked that this is firmly connected to the substrate, and any loose material that could impede adhesion must be removed. It is not necessary to completely remove the old waterproofing. In order to account for the elevated moisture load in the wall/floor connection, the old waterproofing must be removed back to the mineral substrate in these areas only, and preliminary waterproofing must be carried out with Remmers moisture penetration protection.
To achieve optimum bonding between the new and old waterproofing, MB 2K provides a bonding layer that is both easy to work with and highly effective.
2. Subsequent exterior waterproofing on mineral substrates
In many old buildings, basement walls in contact with the ground are waterproofed only with render, packed clay, or – as is often the case – nothing at all.
However, such substrates are ideal candidates for subsequent exterior waterproofing because they create an excellent environment for applying modern waterproofing materials.
1. Removing the old coating
In the base area, which is subjected to heavy loads, remove all of the old waterproofing down to the mineral substrate.
2. Preparation for moisture penetration protection
Break off the edge of the projecting foundation, remove the sintered concrete layer and completely remove any components that could impair adhesion.
3. Priming
Apply an even layer of Kiesol MB to the exposed mineral area.
4. Bonding layer
Apply a layer of WP Sulfatex as a bonding layer for the WP DS Levell.
5. Levelling
Use WP DS Levell to level out any unevenness while the material is still wet.
6. Sealing cove
Use a curved trowel to create a sealing cove with WP DS Levell while the material is still wet in accordance with WTA Code of Practice 4-6.
7. Bonding layer/scratch coat
Spread MB 2K over the entire surface area of the old waterproofing as a contact layer.
8. Surface waterproofing
After the scratch coat has reacted, apply two coats of MB 2K as the waterproofing layer.
9. Thermal insulation
Once the material is sufficiently dry, bond the thermal insulation to the waterproofing over its entire surface area using MB 2K.
10. Protecting the waterproofing
Install DS Protect up to ground level.
1. Preparation for moisture penetration protection
Break off the edge of the projecting foundation. Remove the sintered layer on the concrete foundation, remove any components that could impair adhesion.
2. Priming
Apply an even layer of Kiesol MB.
3. Bonding layer
Once the primer is dry, apply a layer of WP Sulfatex as a bonding layer for the WP DS Levell.
4. Levelling
Use WP DS Levell to level out any defects, open joints or unevenness while the material is still wet.
5. Sealing cove
Use a curved trowel to create a sealing cove with WP DS Levell while the material is still wet.
6. Bonding layer/scratch coat
Apply a scratch coat of MB 2K over the entire surface of the prepared substrate.
7. First waterproofing layer
Once the scratch coat has dried, apply a first waterproofing layer of MB 2K.
8. Second waterproofing layer/b>
As soon as the first layer is dry enough to resist damage, apply the second layer of MB 2K.
9. Thermal insulation
Once the material is sufficiently dry, bond the thermal insulation to the waterproofing over its entire surface area using MB 2K.
10. Rough casting/wall base render
Scatter SP Prep onto another contact layer of MB 2K while it is still wet as a bonding layer for SP Top SR.
11. Plinth render
Apply SP Top SR after 24 to 48 hours.
12. Render waterproofing
Seal off the render waterproofing with MB 2K so that the pores are closed. Apply the waterproofing to at least 5 cm above ground level.
13. Protecting the waterproofing
Install DS Protect up to ground level.
Plinth waterproofing with MB 2K – unbeatable reliability
Because several different types of waterproofing tend to meet in the ground course region, problems have often occurred here at the transitions between materials as a result of insufficient adhesion, different mechanical and thermal properties, etc. But now that's a thing of the past!
In order to reliably meet the technical and design requirements over the long term, the plinth must be provided with adequate protection against exterior stresses. Firstly, the ground course region – which extends from 30 cm above ground level to 20 cm below it – is exposed to varying levels of moisture. Secondly, in the transitional areas between waterproofing/material types, i.e. in the region of transition to the soil, there are often stresses caused by mechanical and thermal loads. With the new MB 2K, all waterproofing work can be carried out reliably with the same material. Whatever the application, MB 2K has the appropriate test certificates or proof of suitability. As well as having unbeatable crack-bridging properties at low layer thicknesses and an extremely low drying time, the material is also exceptionally easy to work with. Its special thixotropic properties mean that Remmers MB 2K can be applied just as easily as a grout as it can with a spreader or sprayer.
1. Priming absorbent substrates
Prime the prepared mineral substrate with Kiesol MB up to at least 30 cm above ground level.
2. Bonding layer
Apply WP Sulfatex as a bonding layer.
3. Levelling
Use WP DS Levell to level out any unevenness while the material is still wet.
4. Griound course waterproofing
Apply at least two coats of MB 2K as the waterproofing layer.
5. Ground course insulation
Professional application of the ground course insulation with MB 2K. Apply the reinforcement mortar VM Fill and finishing render VM Fill rapid in the area exposed to splashing water.
6. Render waterproofing
Seal off the ground course render with MB 2K so that the pores are closed. Apply the waterproofing to at least 5 cm above ground level.
7. Protecting the waterproofing
Installation of DS Protect up to ground level.
8. Colour finish
Use Color PA over wall base render and render waterproofing.

1. The classic system, tried and tested over decades
A proven long-lasting solution thanks to Kiesol and WP Sulfatex
The Remmers Kiesol system is a milestone in the story of subsequent interior waterproofing for basements: Developed more than 40 years ago and used hundreds of thousands of times, this refurbishment system stands head and shoulders above the rest when it comes to protection against moisture and salts.
Used as a primer, Kiesol stabilises, compacts and hydrophobises the wall surface, reducing the stresses in the contact zone between the wall and the waterproofing slurry. WP Sulfatex is a slurry with a high resistance against salts, which is applied to the primed surface 'wet-on-wet'. The white renovation plaster used afterwards is an effective condensate buffer that provides sufficient storage capacity for all moisture levels.
Application examples
- Tried-and-tested system for basements with normal to high exposure to moisture. The renovation plaster SP Top white is used for sorption
- All types of basements, e.g. basements used for high-value items or basement flats
Properties
- Resistant to pressing water
- High sulphate resistance and low effective alkali content (SR/NA)
- Excellent adhesion to the substrate
- WTA-certified to 2.5 bar negative pressure (corresponds to 25 m water column)
- Water vapour diffusion open
2. The flex system, for innovative interior waterproofing
A new approach with MB 2K and Power Protect [eco]
Interior waterproofing is normally carried out with rigid, mineral waterproofing slurries. However, these products cannot permanently close dynamic cracks – nor are they impervious to radon. For this reason, Remmers recommends that basements used for important applications are waterproofed with a technically sophisticated combination of the crack-bridging waterproofing slurry MB 2K – with tested imperviousness to radon – and the Power Protect [eco] system, an ecologically and economically sustainable renovation and insulation system that has been awarded the German ‘Blue Angel’ eco-label.
Installing the system couldn’t be easier. The environmentally friendly Power Protect [eco] panels are primarily made from the heat-insulating mineral perlite and recycled cellulose. They can simply be adhesively bonded onto the MB 2K – the WTA-certified solution for interior waterproofing – by floating, and then plastered over. And that’s it!
Application examples
- Tried-and-tested system for basements with normal to high exposure to moisture. Sorption takes place through the Power Protect [eco] system
- Heated basements of all types, used for high-value applications
- Cracked exterior basement walls
Proprties
- Resistant to pressing water
- Crack-bridging
- Thermally insulating
- Impervious to radon
- High sulphate resistance and low effective alkali content (SR/NA)
- Excellent adhesion to the substrate
- WTA-certified to 0.75 bar negative pressure (corresponds to 7.5 m water column)
1. Preliminary work
Remove old plaster and coatings to 80 cm above the damaged region, or to a suitable level following investigation, and chase out damaged joints to a depth of 2 cm.
2. Priming
Apply an even layer of Kiesol (1:1 with water) over the prepared substrate. Pre-wet highly absorbent substrates with water.
3. Bonding layer
Within the reaction time of Kiesol (1:1 with water), use a slurry brush to apply the bonding layer of WP Sulfatex.
4. Levelling
Use WP DS Levell to level out any unevenness while the material is still wet.
5. Sealing cove
Use a curved trowel to create a sealing cove with WP DS Levell while the material is still wet in accordance with WTA Code of Practice 4-6.
6. First waterproofing layer
Use a slurry brush to apply the first waterproofing layer of MB 2K over the levelling layer.
7. Second waterproofing layer
Apply the second slurry layer of MB 2K over the first layer once it is completely dry. Depending on the water impact class, several coats may be necessary.
8. Affixing the mould remediation panels
Create an adhesive bed of PP Fix over the entire surface area of the dry waterproofing layer by floating. Position the Power Protect [eco] panels on the wall, press on and align. Avoid creating cross joints.
9. First filling layer
Using a toothed trowel, apply the filling and reinforcement mortar PP Fill onto the front side of the panel to a layer thickness of 3 mm.
10. Applying the reinforcement
Using a smoothing trowel, embed the reinforcement fabric Tex 4/100 into the mortar in vertical strips free of pleats (allow individual strips to overlap by at least 10 cm).
11. Second filling layer
Apply a further layer of the filling and reinforcement mortar PP Fill to a thickness of approx. 2 mm over the reinforcement layer once it has set sufficiently. To create a fine, closed surface ready for painting, smooth off PP Fill with the smoothing trowel and rub if necessary once stiffened.
1. Substrate pre-treatment
Remove old plaster and coatings to 80 cm above the damaged region and chase out damaged joints to a depth of 2 cm.
2. Priming
Apply an even layer of Kiesol (1:1 with water) over the prepared substrate. Pre-wet highly absorbent substrates with water.
3. Bonding layer
Within the reaction time of Kiesol (1:1 with water), use a slurry brush to apply the bonding layer of WP Sulfatex.
4. Levelling
Use WP DS Levell to level out any unevenness while the material is still wet.
5. Sealing cove
Use a curved trowel to create a sealing cove with WP DS Levell while the material is still wet in accordance with WTA Code of Practice 4-6.
6. First waterproofing layer
Use a slurry brush to apply the first waterproofing layer of WP Sulfatex over the levelling layer.
7. Second waterproofing layer
Apply the second layer of WP Sulfatex over the first waterproofing layer once the first layer has dried enough that it can no longer be damaged.
8. Rough casting
Broadcast the preparatory mortar SP Prep over the entire surface area of a further waterproofing layer of WP Sulfatex wet-on-wet.
9. Refurbishment render application
Apply SP Top White after 24 to 48 hours.
10. Surface finish
Once incipient stiffening has occurred, rub the SP Top white with a sponge float and a small amount of water, or – optionally – comb it and apply SP Fill Q3 over the top.
The cream procedure without void filling
Cream never fails – Kiesol C+
When comparing the properties of the currently available injection procedures for producing subsequent cross-sectional waterproofing, or the product systems that are available for this, it becomes clear that Remmers cream technology has considerable advantages over liquid product systems – and even over other cream-based products on the market. Kiesol C+ is WTA-tested and certified for injection up to 95% moisture saturation.
The preliminary investigations that used to be necessary in the case of liquid injection materials before a procedure could be selected can now be eliminated, because Kiesol C+ can be used at any level of moisture saturation. The narrow, horizontal drill holes minimise the drilling work and amount of material needed, as well as making the procedure quicker. Thanks to these special drill holes, subsequent filling with borehole suspension is no longer necessary.
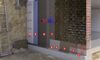
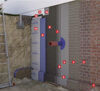
1. Making drill holes
Drill holes with a diameter of 12 mm at a spacing of 12 cm horizontally into the bed joint.
2. Cleaning the drill holes
Use oil-free air to blow any drilling dust out of the holes.
3. Injecting the material
Use a sealant gun, injection lance, injection kit or suitable machine technology to fill the drill hole with Kiesol C+.
4. Sealing the drill holes
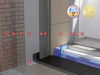
Once injection is complete, seal off the drill holes at the surface using WP DS Levell.
5. Supporting measures
Create a vertical waterproofing strip in the Kiesol system, consisting of primer (Kiesol diluted 1:1 with water), substrate levelling with WP DS Level and waterproofing with WP Sulfatex. Apply to at least 30 cm beyond the level of the drill holes. Apply the sealing cove in accordance with WTA Code of Practice 4-6.
Further refurbishment measures
In addition to retrofitting structural waterproofing in the ground course and basement area, there are other measures available for refurbishing your home. Remmers also offers suitable systems for these projects. Although these systems are not covered by the Remmers International Guarantee, you can still rest assured: with our systems, you are on the safe side when it comes to renovation!